📠UsVox Virtual Fax - How to Manage
Created by the UsVox Support Team
✅ Step 1: Open the UsVox Virtual Fax Panel
At the computer Right corner of the screen click on the ‘show hidden icons’
Right click on the UsVox Virtual Fax Icon,Click on show.

✅ Step 2: Use the Virtual Fax Control Panel
The Virtual Fax control panel window opens with the history of old faxes sent, status of active faxes and multiple icons.
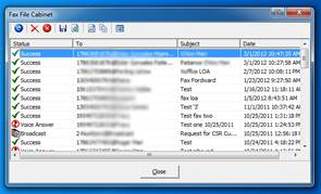
Control Panel Icon List
|
|
RESEND icon is used to resend the fax or to change the Recipient
|

|
|
DELETE icon removed the fax from the history list
|

|
|
SAFE TO FILE icon is use to safe the fax history list on on an excel format (this icon will not safe the fax)
|

|
|
REFRESH icon refresh the history list
|

|
|
VIEW FAX IMAGE icon shoe the fax send on a image viewer
|

|
|
COVER PAGE NOTE icon show the cover page use for the fax send
|

|
|
SETTINGS icon open setting window, show at: How to Install UsVox Virtual Fax Print Driver
|

Status Icons List
|
|
SUCCESS, Fax was send successful
|

|
|
BUSY Recipient Fax line was busy after the system try 3 times
|

|
|
VOICE ANSWER Recipient Fax line was answer by a person or Voice mail
|

|
|
FAILED Recipient Fax line with problem, noise, cancel signal, etc.
|

|
|
REMOTE FAX ERROR Remote fax cancel the fax or hang up the call
|

|
|
BROADCAST Fax was send to multiple Recipients
|

Need Help?
If you need help using the Virtual Fax panel, feel free to contact our support team.
📞 1.855.MyUsVox (698-7869)
📱 Call Support at 1786-275-5888
HABLAMOS ESPAÑOL